Rancilio Silvia rebuild.
It started with our beloved Rancilio Miss Silvia all of a sudden not brewing. Meaning, water would come out the steam wand but not the group head. I took it apart and so began a couple months of it sitting on our dining table as I essentially ended up rebuilding it.


The good news: she works like new. There really is no bad news. What's awesome, like I mentioned in the post about our splurging on a Rancilio Silvia Pro, is that all the parts are easily accessible, they're cheap, and replacing them is really simple.
It started with the 3-way solenoid. That part is like an on-off switch for the water to the brewhead.
As K noticed, the crack is pretty obvious. As are the water stains behind it. Makes sense why the machine didn't brew. This was by far the most expensive part (about $70) but a simple fix.
While I was replacing it, I discovered a little hack to keep water from potentially dripping behind and getting underneath the drip tray.
It involved cutting a short (4cm) piece of PVC (which I spray painted black) and glueing it to the end of the plastic drip nozzle. The point was to shorten the fall the water had to make to ensure it dripped directly into the tray. Pretty clever. Oh, for this first part of the rebuild I had a helper.
Then lots of things took place and Miss Silvia sat patiently. I finally ordered and received all the parts so carved out some time to finish the job. The parts I rebuilt included the following:
- Boiler (gasket)
- Group head (the solenoid, gasket, and screen)
- Steam wand (valve, wand, and knob)
Essentially, minus the pump, pretty much all of what makes up an espresso machine. First up was the boiler. It was leaking so I figured it could stand to be taken apart, cleaned, and fitted with a new gasket.
It's heavy because it's solid brass. After taking it apart, I sanded the ends that joined together to ensure a tight seal. In the third photo above, the old gasket is on the left. It's pretty clear it needed replacing. I also ordered an insulating sleeve to try to keep some heat from dissipating as it brews and steams. Since all of the electrical connections needed to be removed, I labeled them as well.
Next up was the group head. It needed a new gasket. Uhh, I ended up having to drill out the old one because it was so solidified. The new part is about $4. I've already made a note to replace it on our Silvia Pro every year. The new one looked nice, followed by a new screen. I also had to tear apart the old screen in order to peal it off the brass collar to which it was attached. It was time.
When I twisted on the portafilter to fully seat the new gasket, the Silvia felt like a new machine already. I wasn't done.
Finally, I needed to rebuild the steam valve. This is one of the awesome things about the Silvia. A new wand is available, but it costs about $80. The parts needed to rebuild the valve cost under ten bucks and this video from Stefano pretty much explains the entire process.
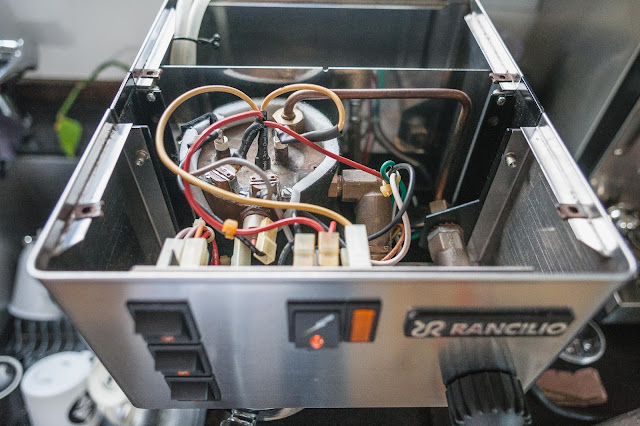
This is why it needed to be rebuilt:
That puddle inside the case was from a leak as I released the steam knob. No bueno. After removing the valve from the machine with an 18mm and a 22mm wrench, I took it to my vise and dissected it.
The gasket was the culprit for the leak. Maybe the two o-rings, too.
The old one is on the left. It's been compressed from years (thirteen, I think) of opening and closing the steam valve.
In order to allow the valve to smoothly open and close, I applied some food-grade grease to it.
Then put it all back together and tested. No more leaks.
Then I tested the group head. Good to go.
Then I put Miss Silvia back together.
She's basically brand new. I'm excited to make some espressos with her tomorrow.


